DEVELOPMENT SERVER: content may be inaccurate

CSV Imports and Exports

Introduction

The CSV Import feature of Grid Manager provides one way to perform “bulk” updates which create, modify, or delete many DNS and/or DHCP objects at once. Not every imaginable use case is supported, but most common tasks are fairly straightforward.

Caution: it is not possible to “undo” or roll back a CSV import after it is executed!

When in doubt, we highly recommend using development IPAM for proof-of-concept testing.

Note that you can also perform “bulk” updates programmatically using the IPAM API; the advantages and disadvantages of each approach vary depending on the nature of the task at hand.

Creating CSV Data Files for Import

For your convenience, Technology Services has created ready-made template data files for a number of common tasks, which can be used for their intended purpose just by reading and following the instructions on this page.

If you wish to adapt any of the templates for other purposes, or to create your own data files from scratch, please refer to CSV Import Reference in the vendor documentation.

Performing a CSV Import

Once you have created a CSV data file, use the following steps to import your data file into Grid Manager:

  1. Click “CSV Import” on the Toolbar panel to bring up the CSV Import Wizard.
  2. Choose the desired import type:
    • Add
      Adds a new Grid Manager object based on the data in each row (will fail if an object with the same required field values already exists).

    • Override
      Uses the required field values in each row to select an existing Grid Manager object (will fail if no suitable object exists), then overwrites any other attributes of that object specified in the remaining columns.
    • Merge
      Uses the required field values in each row to select an existing Grid Manager object (will fail if no suitable object exists), then fills in any attributes specified in the remaining columns for which the object does not already have a value.
    • Delete
      Uses the required field values in each row to identify and delete an existing Grid Manager object.
    • Custom
      See vendor documentation.
    • Replace
      See vendor documentation; use with caution.
  3. Click “Next”.
  4. Click the “Choose…” button and choose a CSV file to upload.  The file name should appear in the text box.
  5. Optionally select how Grid Manager should behave “On error”.

    Note: no matter which behavior you select, any rows before the first error row will always take effect.
  6. Click “Next”.
  7. The first few rows of your data file should appear in the preview area (separated into columns); make sure it looks reasonable.
  8. Click “Import” to begin the operation.

    Note: if you click “Save & Close” at any point prior to clicking “Import” in this step, your job will be saved but not executed.  See Managing Existing CSV Jobs (below) to find it again.

  9. The “CSV Import Progress” window will appear, showing the current status of your job (probably “Import pending”).
  10. You may wait here for your job to complete; when it does (typically within about 30 seconds), the current status will change to “Import successful” or “Import unsuccessful”.
    Alternatively, you may click “Close & Run in Background” to dismiss the dialog box and work on something else while you wait; see Managing Existing CSV Jobs (below) to find it again.
  11. Once the job has completed, check the “Rows with errors” counter to see if any errors were generated.
    • If so, click the “Download Errors” button to retrieve another CSV file containing the error rows (prepended with their corresponding error messages).
    • Remember: any rows from your original CSV file that did not produce errors will still have been imported!
  12. Click “Close” to dismiss the dialog.

Managing Existing CSV Jobs

Click “CSV Job Manager” on the Toolbar panel to display a table containing your CSV jobs submitted within the last 30 days.

Use the hamburger menu icon in each table row and click “Edit” to open the Edit CSV Import Job dialog box, which includes an “Import” button to execute the job.

Grid Manager allows you to Edit a job which has already been executed and click Import to execute that same job again without re-uploading the file, but if you do so, the information about the previous run (timestamps, error file, etc) will no longer be available in CSV Job Manager.  It is usually preferable to start a new import job instead.

You can also use the hamburger menu to Delete a job which has not yet been executed, or Download the Error File from a job which terminated unsuccessfully.

Templates

The following templates are available to help you perform common tasks via CSV Import.

Each template contains at least one header row which can be used exactly as provided, followed by one or more sample object rows which should be modified (and more rows added if necessary) to reflect the actual data you wish to import. The header row beginning with e.g. “HEADER-Foobar” tells Grid Manager how to interpret the columns of the corresponding object rows beginning with e.g. “Foobar” (which must be a valid object type).

Some templates include columns whose values are described as optional; you may safely choose to leave these columns blank when filling in your object rows.

  • Create new DNS-only Host Records
    Type: Add
    Importing this spreadsheet will create a new Host Record for the FQDN in each row, with the specified IPv4 and/or IPv6 address(es) and Host Aliases. You must specify at least one address. The “aliases”, “EA-Property Tag” (Property Tag extensible attribute) and “comment” values are optional. Host records created using this template will not be enabled for DHCP.
  • Create new DHCP-enabled Host Records
    Type: Add
    This template expands on the previous one to create new Host Records whose IP addresses are also enabled for DHCP. Each new Host record to be created needs multiple CSV rows:
    • one “HostRecord” row specifying the FQDN and all of its associated IPv4 and/or IPv6 addresses (as well as optional “aliases”, “EA-Property Tag”, and “comment” values)
    • zero or more “HostAddress” rows to enable the DHCP checkbox and specify the associated MAC address for each individual IPv4 address within the Host
    • zero or more “IPv6HostAddress” rows to enable the DHCP checkbox and specify the associated DUID for each individual IPv6 address within the Host
  • Enable DHCP for Existing Host Addresses
    Type: Override
    For each row, “parent” and “address” must match the FQDN and an IPv4 or IPv6 address of an existing Host record in IPAM. Importing this spreadsheet will enable the DHCP checkbox for that IP address and overwrite its associated MAC address or DUID (as described in Adding DHCP to a Host record).
    Hint: you can obtain names and IP addresses of existing Host records on a network (to use as a starting point) by opening the Network in IPAM view and exporting visible data.
  • Add IP Addresses to Existing Host Records
    Type: Add
    For each row, “parent” must match the FQDN of an existing Host record in IPAM. Importing this spreadsheet will assign an additional IP address to that Host record. Optionally, you may choose to enable DHCP for newly added IP addresses.
  • Create Stand-alone DNS Records
    Type: Add
    Use this template to create new Stand-alone DNS Records of various types. Each type has its own header row; please omit any unused header rows from your data file. All “comment” values are optional.

    Keep in mind that Host Records are often (but not always) preferable to stand-alone A and AAAA records.

  • Importing this spreadsheet will create a new DHCP Fixed Address with the IP address and MAC address or DUID specified in each row. The “EA-Property Tag” (Property Tag extensible attribute) and “comment” values are optional.

  • Add MAC Addresses to a MAC Address Filter
    Type: Add
    Importing this spreadsheet will add the MAC address in each row to the MAC Address Filter whose name appears in “parent”. The “registered_user”, “EA-Property Tag” (Property Tag extensible attribute), and “comment” values are optional.
  • Modify Existing Stand-alone DNS Records
    Type: Override
    For each row, the required fields (indicated with asterisks) must match an existing Stand-alone DNS Record in IPAM.  Importing this spreadsheet will modify that record according to the values specified in the remaining columns.  To modify a required field such as the address of an A record, specify the old value in “address” and the new value in “_new_address” (leave “_new_address” blank if you don’t want to change the address). Each type has its own header row; please omit any unused header rows from your data file.

Exporting data from Grid Manager

Many tables in Grid Manager can be exported as a downloadable CSV in two different ways, using the drop-down menu for the Export (up arrow) button:

screenshot

  • Choose “Export visible data” to download a CSV containing precisely the columns and values that are actually visible within the current table (i.e. as shown on the screen, except that all pages of the table are included).
  • Choose “Export data in Infoblox CSV Import Format” to download a full CSV representation of the Grid Manager objects that appear in the current table, including all of their configuration attributes.

Other tables in Grid Manager provide only a single Export button with no drop-down menu; this is equivalent to “Export visible data” as described above.

You can restrict which rows (objects) are included in the CSV by applying a Filter to the table beforehand.

MAC Address Filters

This page contains instructions for creating and managing MAC address filters for DHCP.

Introduction

A MAC Address Filter is a Grid Manager object which keeps track of a set of MAC addresses.

MAC Address Filters are typically used to restrict access to IPv4 DHCP Ranges. Once you have configured your MAC Address Filter the way you want it using the instructions below, see Restricting Access to a Range to apply it to a DHCP Range.

Creating a new MAC Address Filter

If you need a new MAC Address Filter, please email hostmgr to request one. Provide the following details:

  • a desired name for the new MAC Address Filter object.

    There is a single global namespace for all Filters, so try to choose something reasonable that incorporates the department or group for which this filter is relevant. If in doubt, explain what you plan to use it for, and we will help you choose a suitable name.
  • the name(s) of one or more network models (from Contacts Database) that should confer “ownership” rights to this MAC Address Filter. Any user with permissions on any of the named network models will automatically be given permission to manage this MAC Address Filter as well (updated nightly).

    These network model names will be stored in Grid Manager as values of an Extensible Attribute called “Owned By Network”. Modifying or removing this attribute may result in loss of permissions on the MAC Address Filter.

Managing MAC addresses in a MAC Address Filter

To open a MAC Address Filter:

  1. Navigate to Data Management > DHCP > Filters using the rows of tabs at the top of the screen.
  2. Open the desired MAC Address Filter by clicking on its name in the table.

This will display a table containing all MAC addresses currently present in the MAC Address Filter.

If your table contains many rows, see Using the Table Controls in Getting Started with IPAM.

Adding a MAC address

After opening a MAC Address Filter as described above,

  1. Click the Add (+) icon above the table.
  2. Enter the desired MAC address.
  3. Optionally, you may set an expiration time at which this MAC address will be automatically removed from the MAC Address Filter.
  4. Click “Next” at the bottom of the dialog window.
  5. Optionally, you may enter a username in the “Register as User” field to associate with this MAC address (for your own tracking purposes).  If you don’t want to do this, just leave it blank.

  6. Click “Save & Close”.

Removing a MAC address

After opening a MAC Address Filter as described above,

  1. Select the checkbox for the MAC address you wish to remove (making sure no other checkboxes are selected).
  2. Click the Delete (trash can) icon above the table.
  3. If you’re sure, click “Yes” when the confirmation dialog appears.

IPAM Training Quick Reference

go.illinois.edu/ipamtraining (this page)

  1. Open https://dev.ipam.illinois.edu
  2. Double-check that the login screen says “DEVELOPMENT GRID”!
  3. Click “SSO Login” or see go.illinois.edu/ipamlogin for detailed login instructions
    (If you don’t have any Contacts Database permissions, contact hostmgr to request demo access to dev.ipam)
  4. Follow along with the live training instructions or the self-guided tutorial in Getting Started with IPAM

Dummy Objects

Dummy objects (in development grid only) that everybody has permissions on, for training purposes:

  • sandbox.illinois.edu
  • 192.168.0.0/26 (sandbox-net)
  • 2001:db8::/64 (sandbox-net)
  • sandbox-macfilter

Sample dig commands

  • dig @dev.ipam.illinois.edu hostname.sandbox.illinois.edu IN A
    (variations: “IN AAAA”, “IN CNAME”, “IN any”, etc)
  • dig @dev.ipam.illinois.edu -x 192.168.0.5

IPAM Service Documentation

The service documentation at go.illinois.edu/ipam contains step by step instructions for common tasks.

Known Issues

This page summarizes known issues with IPAM Grid Manager that may be relevant to campus network administrators.

Authentication

Discovered Data

  • Please avoid using the “Ping” (and “Multi-Ping”) toolbar buttons within IPAM.  Successful pings have the side effect of storing “Discovered Data” for the IP which unfortunately cannot be cleared using normal permissions; it must be cleared by hostmgr (or a nightly automated script) on your behalf.  This Discovered Data can inconvenience you in several ways, including manifesting visually in IPAM as a purported “conflict” or “unmanaged” address, and/or preventing you from creating a Range.

Leases

  • In IPAM view (Viewing Leases in a Network), “Static” Leases from Fixed Addresses or DHCP-enabled Hosts are only displayed if the IP in question happens to fall within a DHCP Range.
  • Depending on your individual network permissions, some users may experience a significant delay and eventual timeout when clicking on the Current Leases tab.  The text of the error message is:
    “The system is taking longer than expected to complete your request. The system will continue to process any changes you made in the background. Please wait, then check whether your changes were applied. If you did a search, please refine your query and retry your request.”
    Workarounds:
    • wait for it to time out, then apply a Filter (e.g. “IP Address” “begins with” …) to limit the scope of the query
    • use one of the other two methods described in Managing DHCP Leases instead
  • Grid Manager does not appropriately account for Abandoned Leases when calculating the DHCP utilization statistics (per Range and per Network) which are shown in Grid Manager, returned by the API, tracked by dhcpmon, and used to trigger DHCP Threshold Email Alerts.  For example, a Range which contains 90% Active Leases and 10% Abandoned Leases will not generate an alert because Grid Manager considers it to be only 90% utilized, even though live clients may be unable to obtain a lease (depending on how many of the Abandoned Leases are actually still in use on the network).
    Workarounds:
    • dhcpmon has been enhanced to display the most recent Abandoned lease count per network (data updated once per day)
    • hostmgr now receives automated notifications regarding networks which are over 95% full including Abandoned leases, so we can manually reach out to CDB network contacts to let them know when this problem has become serious
  • Addresses within Reserved Ranges are counted (along with DHCP Ranges) in the per-Network DHCP Utilization statistics shown in Grid Manager, returned by the API, and tracked by dhcpmon.  Consequently, the presence of Reserved Ranges may cause a network to appear less full than it actually is.  This does not affect Email Alerts (which apply individually to each Range).
    • Workaround: Edit the Reserved Range and check “Disable for DHCP”.

Search

  • Basic Search for DNS Name does not currently find Host Aliases.
  • Advanced Search for an IPv6 address will only succeed if you enter the exact string representation of the address that Grid Manager uses internally.  For example, you will not find “2620:0:e00:b::53” by searching for “2620:0000:0e00:000b::53” (extra leading zeros) or “2620:0:e00:b:0:0:0:53” (no double colon abbreviation), even though these are all valid representations of the same IPv6 address.
    • Workaround: use Basic Search by IP Address instead.

DNS Traffic Control

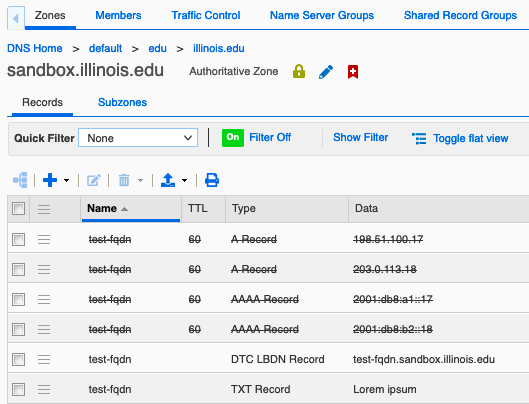
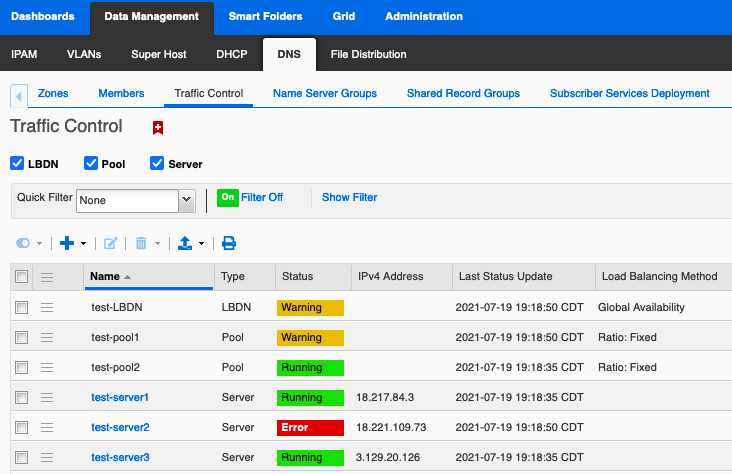
  • DNS Traffic Control may return your fallback records (instead of synthesized responses) for about 1 second after a restart of services in which other DTC configuration changes are being applied, even if those changes have nothing to do with your LBDN.  Mitigation: choose good fallback records.
  • Grid Manager currently displays fallback records in normal font instead of strikethrough font

Misc

Requesting DNS Domains

Requesting New DNS Domains

Your group or organization is not limited to the domains that the University already has defined. We are able to host additional domains that fit the University mission, subject to the rules and requirements described in DNS Standards.

Use the Domain Request Form to request either an .edu subdomain (sample.illinois.edu or sample.uillinois.edu) or a new non-.edu domain (.org, .com, etc) for which you have a University-related need.

Naming Guidelines

Consult the Acceptable Name Guidelines to assist you in picking out names that conform to University policy.

To see if a non-.edu domain you want is available (prior to submitting your request), you can go to the Network Solutions home page and search for it.

Please do not attempt to actually purchase the domain from Network Solutions or any other domain granting institution. The University host manager must be involved in the requesting of the domain in order for our DNS servers to provide the service.

Transferring an Existing Domain

To transfer an existing non-.edu domain to University ownership from another registrar:

  1. Contact the domain owner, and ask them to unlock the domain for transfer and provide you with the transfer authorization code.
  2. Once you have the code, complete the Domain Request Form.  Note that you will need to provide:
    • the transfer authorization code
    • is the domain currently in active use, or is a lengthy disruption in service acceptable?

      If the domain is in active use, we will work with you to perform a seamless migration which ensures that live DNS queries for the domain continue to resolve without interruption, and with consistent answers, at all times during the transfer process.

      If you indicate that a lengthy disruption in service is acceptable because nothing actively depends on this domain right now, we can follow a simpler process which involves less work for both you and us.

  3. For seamless migrations, Technology Services will work with you to import the domain’s current zone data into our nameservers, and then ask you to update the NS records with the current registrar.

    It is important to migrate all of your domain’s DNS records (not just the address record for your website) unless you are certain that you don’t need them anymore.

    Once you have provided the current zone data, do not make any further changes to your DNS records until we confirm that it is safe to do so.

  4. To process your order, an authorization email will then be sent to the the current Administrative Contact of Record (as identified by WHOIS). The Administrative Contact must authorize the transfer within 14 days of receipt of the email. Once our registrar receives this authorization, your request will be submitted to the registry to finalize the transfer.
  5. If for some reason your transfer fails, we will notify you and work with you to retry the transfer. Common reasons why registrars will reject a transfer include:
  • Domain name is within 60 days of initial registration
  • Domain name is within 60 days of a previous transfer
  • No response/negative response to transfer authorization request to current Administrative Contact of RecordIf the transfer still does not succeed after all reasonable efforts have been made, Technology Services will provide at least 7 days notice before removing the zone from our nameservers, to allow you time to update your NS records again.

Please note: the transfer process can take up to two weeks from the time we initiate the transfer.

For other questions about transfers, please email hostmgr.

Automatic Renewals

Non-.edu DNS domains registered through Technology Services are automatically renewed by the registrar 60-90 days before they are scheduled to expire.

The Primary and Administrative contacts listed for the domain in Contacts Database will receive a notification email prior to each auto-renewal, but will NOT need to respond affirmatively in order for the auto-renewal to proceed (this eliminates unnecessary workflow steps for you and for us, and reduces the risk that a domain registration will unintentionally be allowed to lapse).

If you no longer wish to renew a non-.edu domain, please inform hostmgr at least 91 DAYS PRIOR TO ITS EXPIRATION DATE (or sooner if that deadline would fall on a non-business day) to ensure that the change can be processed before the next auto-renewal occurs.  Choose one of the following options:

  • Disable renewal but keep the domain in service until it expires.
  • Deactivate the domain immediately.

Note that removal requests should come from a Primary contact if possible (otherwise we will attempt to reconfirm with a Primary contact).

By choosing to disable renewal but keep the domain in service, you accept full responsibility for any disruption that may occur when the domain expires.  You will NOT receive any further notification from Technology Services when this is about to happen.  As a best practice, we recommend leaving automatic renewal enabled until you are actually finished using the domain.

Q: For how many years at a time will a non-.edu domain be renewed?
A: Each domain will automatically renew for the same duration as its current term, i.e. a domain most recently purchased or renewed for 3 years will auto-renew for 3 years.  If you wish to adjust this cadence, you can contact hostmgr to request a one-time manual renewal for a new term of 1, 2, 3, or 5 years (which will immediately extend the current expiration date by that amount).

Q: Which CFOP will be billed for the renewal fee?
A: Each non-.edu domain has a CFOP on file which is billed $10 per year plus renewal fees equal to the amount that Technology Services pays the registrar (as specified in DNS Standards).  Contact hostmgr if you wish to change the CFOP to which your domain is billed.

Managing DNS for your Domains

Once your domain has been created, you can use IPAM to create and modify most types of DNS records; see Using IPAM for detailed instructions.

Other Information

DNS Basics (KB#47914) is written for a general audience, and briefly explains what a DNS server is used for and which IP addresses are used for the campus DNS servers.  Note that most users will not ever need to change their computers’ DNS settings.

DNS Standards contains information about implementation details related to the campus domain registration policy.

Getting Started with IPAM

This page contains information about navigating the Grid Manager web interface once you have logged in.

Logging In

See How do I log in?

Getting Help

If you have a question not covered by this service documentation, you can try one of the following resources or contact hostmgr for assistance.

Help Panel

All screens and dialog windows in Grid Manager contain context-sensitive help, which appears in the Help panel on the far right-hand side of the window.

  1. If the Help panel is not visible, click the grey “?” icon on the far right to expand it.
  2. Some Help panels contain vertically expanding subpanels.  Expand the subpanel labeled “Help” to see context-sensitive help for the screen you are on.
  3. When you don’t need the Help panel, you can collapse it again to save space.

Vendor Documentation

Extensive vendor documentation for Grid Manager is published in HTML and PDF formats.

Please note that not all functionality described in the vendor documentation is available to you in the University of Illinois IPAM service.

You may find it helpful to peruse the section entitled “About the Grid Manager Interface” when logging in to Grid Manager for the first time.

Browser Information

The vendor documentation includes requirements for your workstation (including minimum display resolution) and known limitations for certain browsers.

A few general tips:

  • Please be patient with the web interface; occasionally it will take a few seconds to finish refreshing after you have clicked on something. Clicking repeatedly will not help, and in fact will probably make you wait longer for the interface to catch up.
  • Don’t use your browser’s Back button within Grid Manager.
  • Don’t use Grid Manager in multiple tabs or windows of the same browser, as they may interfere with each other.
    (However, we have had success using Grid Manager concurrently in two separate browsers, e.g. in one instance of Chrome and one instance of Firefox.)

The list of OS and browser versions tested and validated by the vendor is now maintained in the release notes (which are not publicly viewable), but generally includes recent releases of Firefox, Chrome, Safari, and Edge.  Let us know if you consistently experience problems with the latest version of any of these browsers, and also whether the problem is solved by using a different browser.  Note that Mozilla offers a Firefox Extended Support Release (ESR) which may be helpful in some circumstances.

Basic Navigation: a Guided Tour

If this is your first time using IPAM, we encourage you to actually log in now and follow along with this tutorial.

Upon first login, Grid Manager will display the (fairly sparse) Tasks Dashboard, which doesn’t do much but serves as a landing page.

To illustrate some basic principles of Grid Manager navigation, we’ll begin by browsing Networks in DHCP View.  This is not what you’ll usually do in practice, but it’s the simplest place to start.

Browsing Networks in DHCP View

To display Networks in DHCP View:

  1. Choose “Data Management” from the top row of tabs.
  2. Choose “DHCP” from the second row.
  3. Choose “Networks” from the third row.
  4. Choose “Networks” from the fourth row.

This will display a table containing all Networks that you have permissions on.

screenshot

Unfortunately the Network Name column is not displayed by default, but you can easily add it to the table; see Customizing Table Columns.

Using the Table Controls

Just above the table in the main workspace is a row of icon buttons.  Mouse over each icon in turn to see their names:
Open, Add, Edit, Delete, Export, and Print.

  • To Edit a Network from the table, select the checkbox to its left, and then click the Edit (notepad) icon above the table.

    screenshot

    This opens the Edit Network dialog box. You don’t have permissions to change anything in the Edit Network dialog box, but you can use it to examine the DHCP configuration properties of your Network.  To close the dialog box and return to the table, click Cancel (in the lower left).

  • To Open a Network from the table, just click directly on its address/CIDR (e.g. “192.168.0.0/26”) in the Network column.  Alternatively, you could select its checkbox and then click the Open (right arrow) icon above the table.  Opening a Network takes you to a new screen which we will discuss in the next section.

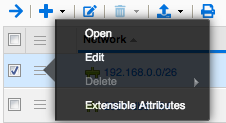
The hamburger menu icon in each table row displays a shortcut menu which provides yet another way to Open or Edit the Network in that row.

screenshot

If your table contains too many rows to display all at once, you can

  • use the page navigation buttons (below the table, on the left) to page through them.

  • start typing the first several characters of a network address e.g. “192” into the “Go to” box (above the table, on the right) to quickly select a matching row. 

    “Go to” only matches one field (whichever one Grid Manager considers to be the primary identifier), so you can’t use it to find e.g. Network Name even if you have added a Network Name column to the table.
  • click “Show Filter” and Apply desired filter criteria to display fewer results.  (Note that you can Filter based on Network Name.)

    screenshot

Opening a Network (DHCP View)

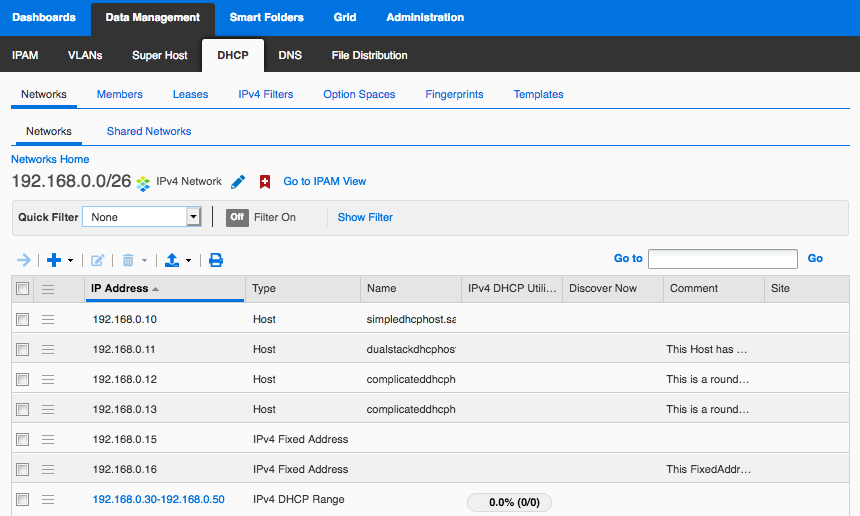
When you Open a Network as described above, the main workspace displays a new table containing all DHCP-related objects (Fixed Addresses, Ranges, and DHCP-enabled Hosts) that have been configured within that Network.

screenshot

From here you could go on to perform a variety of DHCP configuration tasks.

For now, just familiarize yourself with the following new interface elements near the top of the main workspace:

  • The breadcrumb link “Networks Home” (just below the four rows of navigation tabs) may be used to return to the list of all Networks.
  • Next, Grid Manager displays the currently opened object (“192.168.0.0/26”) and its type (“IPv4 Network”).
  • Click the nearby blue pencil Edit icon to Edit the currently opened object.

    Note the difference between this blue pencil Edit icon which edits the currently opened object, and the notepad Edit icon further down which edits the object whose checkbox is selected from the table.
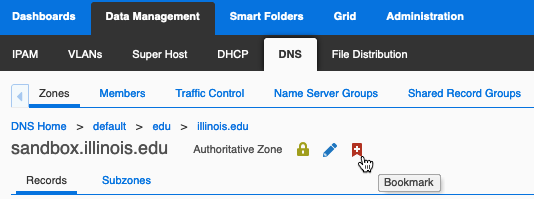
  • Click the Bookmark (red swallowtail flag) icon to bookmark the currently opened object so you can quickly navigate back to it later (see Advanced Tips and Tricks).
  • Click “Go to IPAM View” to Open the current Network in IPAM View (discussed further down) instead of DHCP View.  This is a convenient way to quickly switch between these two views of the same Network.

Opening a Zone

When you open a DNS Zone object as described above, the main workspace displays a table containing either the Records or the Subzones within that Zone (depending on which tab you select from the fourth row underneath the Zone name).

screenshot

Note the following controls near the top of the main workspace:

  • Multiple breadcrumb links allow quick navigation to any ancestor of the current zone, including the DNS View (“default”).  “DNS Home” may be used to return to the list of Views.
  • Click “Toggle flat view” on the Records tab to change the way Host records are displayed in this table.  After you click it, the link text changes to “Toggle hierarchical view”.

    We recommend using Flat view for the Records tab, to ensure that you will always see all manifestations of Host records.

  • Optionally (and independently), click “Toggle flat view” on the Subzones tab to display all descendants of the current zone instead of only its immediate children (note that this may cause the interface to respond more slowly).  Navigate back up to “edu” for a clear illustration of the difference.

Browsing Networks in IPAM View

IPAM View is another way of looking at Networks.  Whereas DHCP View is narrowly focused on DHCP functionality, IPAM View combines configuration data from both DNS and DHCP into a holistic picture of how every IP address in a network is being used (or not – it also displays unused IPv4 addresses).  IPAM View also shows Network Containers which organize Networks into a hierarchical tree structure.

To browse Networks and Network Containers in IPAM View (again, this is intentionally not the quickest method):

  1. Choose “Data Management” from the top row of tabs.
  2. Choose “IPAM” from the second row.

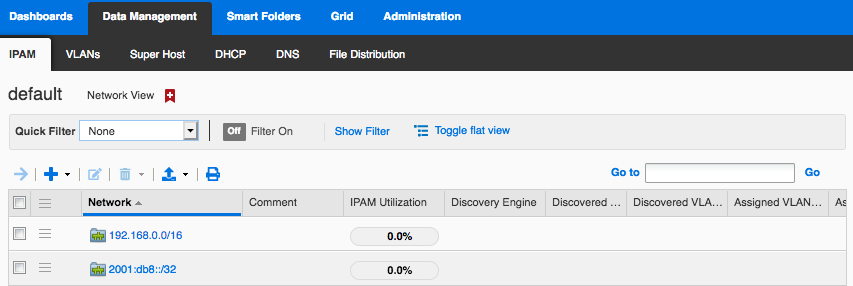
  3. The main workspace will display any top-level Network Containers (shown with a folder icon) which contain at least one Network that you have permissions on.  Note that you don’t have permissions on the Network Container itself, so you can’t see any other details about it.

    screenshot

    This is a separate table from the one we saw earlier in DHCP View, so you’ll want to add the Network Name column again here.

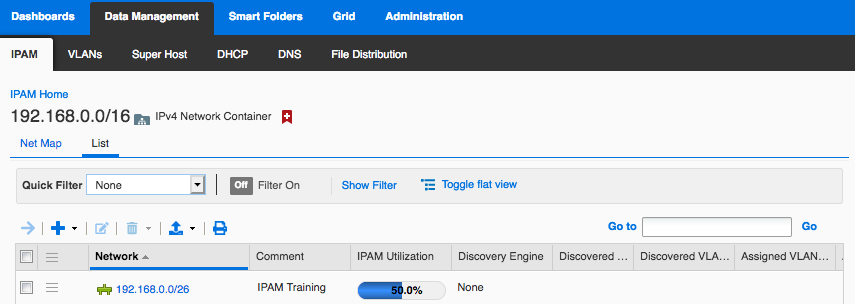
  4. Open a Network Container by clicking its address/CIDR.  At this point a third row of tabs appears with “Net Map” selected by default, and the workspace displays a graphical visualization of the contents of this Network Container (which may include other Network Containers and/or leaf Networks), subject to your permissions.

  5. Choose “List” from the third row of tabs to display the contents of this Network Container in a table instead.

    screenshot

    Note that Network Containers have a folder icon, while leaf Networks have an icon with no folder.  There is also a “Toggle flat view” link which behaves similarly to the one described above for DNS Subzones.

  6. Open a leaf Network by clicking its address/CIDR.

Opening a Network (IPAM View)

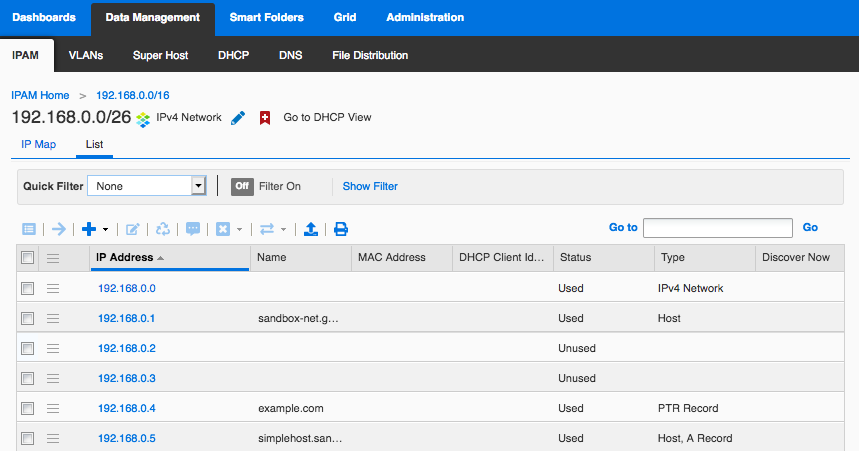
When you open a leaf Network in IPAM View, you can choose “IP Map” from the third row of tabs to display a graphical representation of how each address in the network is used, or choose “List” to display the addresses in a table (generally more useful).

screenshot

From here,

  • Click “Go to DHCP View” to open the current Network in DHCP View (instead of IPAM View).  This is a convenient way to quickly switch between these two views of the same Network.

    In general IPAM View is more powerful, but some DHCP configuration tasks can only be performed (and others are easier) in DHCP View.

  • If you select an IP address which is used by only one object, you can click the Edit (notepad) icon above the table to Edit that object.
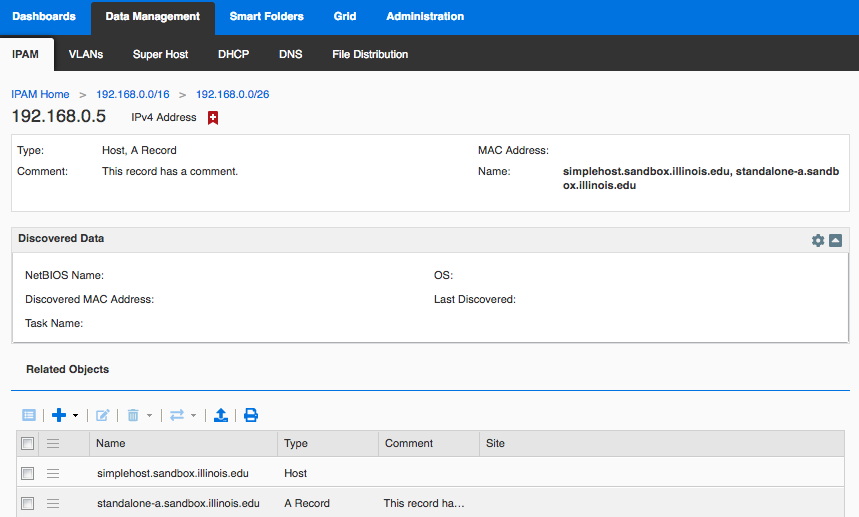
  • Open an IP address (by clicking on it in the table) to display all of its Related Objects in a new table where you can Edit or Delete them individually.  Use the breadcrumb links to return.

    screenshot

  • Be very careful with the Reclaim button (see Reclaiming Objects Associated with IPv4 and IPv6 Addresses in the vendor documentation).  When in doubt, it’s safer to examine the Related Objects individually and make a decision about whether to edit or delete each one.
  • Please do not use the Ping button (see known issues involving Discovered Data).

Global Search

The step-by-step browsing methods above are very helpful for learning how Grid Manager works, but they aren’t usually the quickest way to reach your goal.  Grid Manager provides several practical navigation shortcuts, the most important of which is Global Search.  (Some others will be discussed later in Advanced Tips and Tricks.)

Click the Search (magnifying glass) button in the upper right-hand corner of the interface window to open the Search dialog box.

Use Basic Search to quickly locate objects matching a specific IP address, MAC address, or DNS Name:

  1. Select the “Basic” tab.

  2. Click the left-most drop-down (“Choose Filter”) and select DNS Name, IP Address, or MAC Address.
  3. Optionally select a different operator from the middle drop-down.
  4. Type the desired search value in the text box on the right.
    Please note:

    • MAC Address values should be punctuated with colons, e.g. “aa:aa:aa:00:00:10

    • When searching by DNS Name, try to use at least a partially-qualified name.  For example, searching for “www.techservices” is much more efficient than searching for “www“.

  5. Click “Search”.
    (see screenshot under examples below)

or use Advanced Search for other types of searches:

  1. Select the “Advanced” tab.
  2. In the first filter criterion (Type equals All), click the right-most drop-down (All) to select what type of objects you want the search to return, such as “All Networks” or “All Zones”.

    If you do not filter by Type, then by default Grid Manager will search ALL objects in its database. While you might need to do this on rare occasions (if you aren’t able to find what you want using a more specific search), it takes a lot longer, and is also more likely to return a large number of uninteresting results.

  3. Type your desired search value into the main (unlabeled) text box above the filter criteria.  You can enter a regular expression in this field; see Supported Expressions for Search Parameters in the vendor documentation for details.
  4. Check “Include Extensible Attributes Values” in case the value you are searching for appears in an extensible attribute (such as Network Name).  If you leave this unchecked, only built-in object fields will be searched.

  5. Optionally click “+” to add more filter criteria.
  6. Click “Search”.
    (see screenshot under examples below)

Once your search results are displayed, you may:

Other Tools

This page contains information about other DNS and DHCP tools available to campus IT professionals.

Production IPAM

Production IPAM Grid Manager is located at https://ipam.illinois.edu/

See Using IPAM for instructions.

Development IPAM

The development IPAM system located at https://dev.ipam.illinois.edu/ is a good place to safely experiment with new CSV imports, API scripts, or interface features you haven’t used before. Please note that we enable IT Pros to use dev.ipam on an “as is” basis, with the important caveats that it is not always available, often contains data that is inaccurate or extremely out of date, and may be completely overwritten at any time without warning.

dev.ipam is not reachable from off-campus, so you may need to use the VPN.

Test authoritative DNS queries sent to dns-dev1.techservices.illinois.edu (from on campus) will be answered using the data configured in dev.ipam:

dig +norecurse @dns-dev1.techservices.illinois.edu foo.sandbox.illinois.edu a

dhcpmon

dhcpmon provides graphs for each subnet showing the utilization of dynamically-allocated DHCP addresses over the past day, week, month, and year.

Please note the following limitations:

  • actual usage data may be up to 15 minutes older than the graph timestamp
  • abandoned lease counts are updated only once per day
  • addresses from multiple Ranges are aggregated together
  • unused addresses within Reserved Ranges are misleadingly counted as available even though in fact they can never be assigned to a DHCP client (see also Known Issues)

In general, dhcpmon works well for the common case of nets containing a single DHCP Range (with optional Exclusion Ranges).  If your net contains multiple DHCP Ranges and/or any Reserved Ranges, be very careful when drawing conclusions from dhcpmon data.

Domain Request Form

The Domain Request Form is located at go.illinois.edu/domainrequest

See Requesting DNS Domains for more information.

Contacts Database

Network administrators can now keep their identities up to date using Contacts Database.

dig

dig is the preferred client tool for troubleshooting DNS issues because of its flexibility and detailed output. This section is intended as a quick-start guide to help you get it running on your workstation.

See also https://help.dyn.com/how-to-use-binds-dig-tool/

Windows:

  1. Browse to https://downloads.isc.org/isc/bind9/cur/9.16/ and download the latest stable release of BIND 9 as a Windows zip file (e.g. “BIND9.16.7.x64.zip“).
  2. Extract the zipfile’s contents to a temporary directory on your workstation.
  3. Run “BINDInstall.exe” and choose the “Tools only” option (since you don’t want to install the BIND server on your workstation).
  4. Open a Command Prompt and run dig from the directory where you installed it, e.g.

    cd "C:\Program Files\ISC BIND 9\bin"
    dig

    Note that previous versions installed dig under C:\WINDOWS\system32\dns\bin or C:\WINDOWS\SysWOW64\dns\bin

  5. Optionally, you may add the above bin directory to your PATH for convenience (the details of this step are outside the scope of this document, but try searching the web for “set windows path”).

Mac OS X:

  • Modern versions of OS X come with dig pre-installed. Just open a Terminal window and run dig.

Linux:

  • dig is readily available as a package for most linux distributions. Look for a package called “bind-utils”, “dnsutils”, or “dnstools”.

To test that your installation of dig is working, run a simple query:

dig @8.8.8.8 www.illinois.edu a

This should return the IP address of our web server (in the ANSWER section).

Plenty of other documentation has already been written about the details of working with dig; just search the web for “dig tutorial”.
See also the dig manual page.

Host Manager

If you have questions about campus DNS services, email hostmgr@illinois.edu.

IPAM Documentation

Welcome! This space contains detailed technical documentation for IT Professionals regarding the IP Address Management (IPAM) service.

Use the sidebar on the right to navigate.

Quick links:

What’s New

See IPAM News Blog for the latest news regarding the IPAM service.  Use the “subscribe” link at the bottom if you would like to receive notifications of new posts.

Contact Us

General questions or support requests regarding the IPAM service should be directed to Illinois IPAM Hostmgr at hostmgr@illinois.edu (pronounced “host manager”).

Documentation Overview

DNS Standards provides general information and guidelines about the use of DNS on campus.

Requesting DNS Domains explains how to obtain a new domain.

DHCP Standards provides general information and guidelines about the use of DHCP on campus.

Requesting DHCP for Networks explains how to enable autoconfiguration for your network, and provides a conceptual overview of the different behaviors.

Using IPAM explains how to manage DNS and DHCP configuration for your existing networks and authoritative zones using IPAM Grid Manager.

Other Tools contains related information which may be helpful to IPAM users.

Known Issues describes known problems or limitations of IPAM which may be relevant to IT Professional customers.

DNS Standards

This page contains information about implementation details related to the campus domain registration policy.

Introduction

This document describes the standard as set forth by Technology Services pertaining to the governance and rules of the Domain Name System (DNS) Service at the University of Illinois, Urbana-Champaign campus.

EDUCAUSE and the American Registry for Internet Numbers (ARIN) have delegated second level domains and IP address blocks (respectively) to Technology Services, acting on the authority of the University of Illinois at Urbana-Champaign, with the agreement that DNS service will be properly maintained and configured.

Technology Services provides DNS service to the Urbana-Champaign campus and controls allocation, management and delegation of these zones.

Terminology

American Registry for Internet Numbers (ARIN): An organization that allocates IP address space to the University of Illinois at Urbana-Champaign.
Delegation: handing over authority for a portion of the DNS namespace (thereby establishing a new zone)
Domain: a logical subtree of the hierarchical DNS namespace, headed by a domain name such as illinois.edu or example.com
Domain Name: a string of labels separated by dots which identifies an entity on the Internet. Examples: illinois.edu, example.com, www.techservices.illinois.edu.
Domain Name System (DNS): A method of translating a readable name to an Internet Protocol (IP) address.
EDUCAUSE: Grants .edu domains and offers resources for the advancement of higher education to the education community.
FQDN (Fully Qualified Domain Name): The full entry in DNS for a machine, e.g. host.unit.illinois.edu.
Hostmgr (pronounced “host manager”): role within Technology Services who handles campus DNS change requests
Hostname: A domain name given to a network-attached device.
IP Address: A number to identify a device on a network.
IP Address space/block: A group of IP Addresses.
Subdomain: a logical subset (subtree) of another domain, named by prepending one or more additional labels. Examples: unit.illinois.edu and foo.unit.illinois.edu are both subdomains of illinois.edu.  Note that a subdomain does not necessarily require a separate zone.
Subnet: A subset of an IP address space.
Time to live (TTL): The amount of time the authoritative nameserver caches a record when queried by a caching server.
Third-level name: a domain name consisting of three labels.  Example: unit.illinois.edu.
Zone: a portion of DNS namespace delegated to and configured in a particular set of authoritative name servers.  All subdomains of the apex name are part of the zone unless delegated again to form a new zone.

Roles, obligations, and resources

Units DNS requests and maintenance are processed via the unit’s IT professional for network support (aka network admin).
The IT professional for network support is designated by the unit head in agreement with Technology Services.

To identify your network admin, please contact the Technology Services Help Desk.

The primary contact for DNS for Technology Services is hostmgr at illinois.edu.

Unit costs for DNS registrations

Each campus unit is eligible for one subdomain free of charge. Additional subdomains cost $10 per year. Approved vanity domains cost $10 per year plus registration, renewal, and/or transfer fees equal to the amount that Technology Services pays the registrar.

During the illinois.edu migration, campus units will only be billed once per domain, even if the same domain exists in both illinois.edu and uiuc.edu. Each unique domain will be billed separately.

For example:

  • sample1.uiuc.edu and sample1.illinois.edu are the same domain, so only one domain fee is charged.
  • sample1.uiuc.edu, sample1.illinois.edu, and sample2.illinois.edu include two different domains, so two domain fees are charged.
  • sample1.uiuc.edu, sample2.illinois.edu, and sample3.illinois.edu are three different domains, so three domain fees are charged.

General usage of DNS

The use of any domain name or IP address space that is managed by or associated with the University of Illinois at Urbana-Champaign must conform to the policy on Appropriate Use of Computers and Network Systems, which includes a prohibition on use of network resources for commercial or profit-making purposes or other purposes that interfere with the mission of the University.

Inter-unit DNS entries

Units wishing to create pointers from a domain they control to another unit (for example, cs.illinois.edu hostnames pointing into Beckman Institute subnets) should do so in cooperation with Technology Services. Technology Services will set up a discussion so that both groups are aware of the request and can coordinate the use of the new DNS entries.

External domain entries

Units should create and maintain their entries in cooperation with hostmanager, either via delegation or using the self-service management interface. Please see the section on non-.edu domains.

Reverse DNS (in-addr.arpa)

All hosts must have PTR records. This rule is enforced to help the campus be in compliance with industry best practice. As numerous services use PTR records, it can cause considerable problems to users if an IP does not have a matching PTR record.

Time-To-Live (TTL) recommendations

The Time-To-Live (TTL) DNS parameter is used to control how long DNS resolvers cache a DNS record. Setting a TTL value too low reduces the efficiency of caching and increases DNS server traffic/load. Setting a TTL too high means that DNS changes may not be recognized in a timely manner.

The campus standard for TTL records is 1 hour (3600 seconds). Contact hostmgr for changes to a domain’s TTL. TTL changes to individual records can be done by IT Professionals with appropriate access to the record in the IPAM appliance web interface.

Assignment of domains and subdomains

Acceptable Name Guidelines

Units requesting a new third-level name (e.g. xyz.illinois.edu) must meet the following guidelines from the Office of Strategic Communications and Marketing for acceptable domain names. (Pre-existing domains are ‘grandfathered’ under prior guidelines.)

  • The domain name can only contain the characters (a-z), -, and (0-9), which complies with the preferred name syntax guidelines in RFC 1035 (Section 2.3.1)
  • In general, avoid acronyms and initialisms unless they are universally recognized. For example, creativeservices.illinois.edu not cs.illinois.edu (which could be confused with Computer Science.)
  • Supportive of brand – the domain name should not be contrary to the Illinois brand. The UIUC initialism should not be used in newly created domain names.
  • Appropriateness – Language which could be considered derogatory, offensive, or misleading should be avoided.
  • Respectful of scope and role – Third-level campus domain names should reflect high-level organizations in the university (colleges, departments, inter-departmental organizations,) or campus-wide services (www, campusrec, careercenter). Since third-level names apply at the campus level, the requesting unit must have the authority to represent the organization or service indicated or implied by the name. For example, research.illinois.edu could only be requested by a unit on campus that speaks for all research at the campus level.

Name requests which violate these guidelines must be justified and go through an approval process.

Non-.edu (vanity) domains (.org, .net)

Domains outside the .edu namespace (vanity domains) both incur cost and require the approval of the Office of Strategic Communications and Marketing. The following requirements apply in addition to the normal considerations for domain creations:

  • Must be registered through Technology Services.
  • Department/Unit pays registration, renewal, and/or transfer fees equal to the amount that Technology Services pays the registrar, plus $10 per year to Technology Services.
  • Changes to the domain must be kept to a minimum. There may be an additional fee for excessive changes to the domain. Typical traffic would be an initial set up and a few changes per year.

Approval / escalation process

Technology Services works with the Office of Strategic Communications and Marketing to obtain approval for new domain requests.

Approval Process
Unit Network Admin for host or subdomain assignments under an assigned domain, ie: hostname.unit.illinois.edu
Technology Services screens based on existing registrations, and technical and security concerns
Office of Strategic Communications and Marketing final ruling

Third-level subdomains of illinois.edu

Every third-level subdomain of illinois.edu MUST have a corresponding Domain model in Contacts Database, which must be kept up to date by the responsible department/unit.

Third-level subdomains can be implemented in one of two ways.

Separate zone

By default, each third-level subdomain will be created as a separate DNS zone, which will be made available for self-service management via the IPAM web interface.

This option has one significant drawback (resulting from an inherent technical limitation of DNS): if mysubdomain.illinois.edu is a separate DNS zone, then there cannot be a CNAME record at mysubdomain.illinois.edu.

Records in the illinois.edu zone

Alternatively, a third-level subdomain of illinois.edu may be registered as a CNAME record in the second-level illinois.edu zone, along with a small number of fourth-level subdomains (each of which may be either an additional CNAME record or a separate zone).  For example:

  • mysubdomain.illinois.edu  (CNAME record in the illinois.edu zone)
  • www.mysubdomain.illinois.edu  (CNAME record in the illinois.edu zone)
  • etc.mysubdomain.illinois.edu  (separate zone with self-service management)
  • name3.mysubdomain.illinois.edu  (either CNAME record or separate zone)
  • name4.mysubdomain.illinois.edu  (either CNAME record or separate zone)

Records in the illinois.edu zone cannot be made available for self-service management via the IPAM web interface. Changes to these records must be made by request to Hostmgr.

Consider placing records that don’t have specific name requirements (including e.g. dev/test records) underneath a single fourth-level zone.

Requirements for Third Level Domain Requests

The domain name must follow the Acceptable Name Guidelines and all policies outlined in this standard. The person or group making the request must have a university affiliation (registered organization, staff, faculty, student) and the request should be routed through the unit’s Network Admin.

Requested third-level domains must not already exist and must not be reserved for future use (e.g. illinois.edu transition.) Contact Hostmanager to check domain availability.

There is no setup fee for third-level illinois.edu domains, but units will be billed according to the unit costs for DNS registrations (currently $10/year/domain)

The domain request must include:

  • the desired domain name
  • a description of the name and purpose
  • contact information (considerations for hosted vs. delegated)
  • organization codes and account numbers

See Requesting DNS Domains to start the domain registration request.

After approval, Technology Services will process the request and setup access to the domain through the IPAM web interface, or delegate it to the unit’s servers if requested (see below.) Domain requests will be acknowledged within one business day and processed within 5 business days.

Hosts and domains beyond the third level

Domain names beyond the third level are administered by the unit responsible for the third-level subdomain, subject to the following criteria:

  • The names follow the acceptable name guidelines
  • The length of any fully qualified domain name does not exceed 255 characters.

There is no additional cost for beyond-third-level subdomains (i.e. only the third-level domain is billed).

Note that separate DNS zones beyond the third level are usually not necessary unless the third level is registered as a CNAME or the fourth level requires delegation.  For example, you can use IPAM to create records named foo.bar.mysubdomain.illinois.edu inside a third-level zone mysubdomain.illinois.edu even though there is no fourth-level zone bar.mysubdomain.illinois.eduFrom the perspective of a DNS client, the end result is the same; the only practical difference is how things look when you log in to manage them in IPAM (i.e. whether you navigate into a separate Zone to look at all the “bar” records, or whether they are displayed in the third-level zone alongside everything else).

Implementation of changes / requests

  • Changes submitted via the IPAM appliance web interface will take effect immediately.
  • Requests emailed directly to Hostmanager will be hand processed as time allows. Upon completion, Hostmanager will send a completion email to the requestor. We ask that you give your request a full 24 hours for processing and activation.
  • Requests that have a sensitive time-line, either during regular business hours or outside of them, should be emailed to host manager and clearly communicated in the body of the email the desired time of activation. We ask that you coordinate all time sensitive requests a full 24 hours in advance.
  • Requests to modify TTLs
    The campus standard TTL is set at the domain level and inherited by all records of that domain. The campus standard is 1 hour. This duration can be lowered to help propagate changes to high profile machines (i.e Mail servers, Web servers, etc..) to external nameservers. TTL changes to individual records can be done by IT Professionals with appropriate access to the record in the IPAM appliance web interface; if a TTL change is needed for a record you do not have access to, please contact hostmgr.

Delegation of domains to unit-managed DNS servers

Units may request Technology Services to delegate management of the domain to unit-managed DNS servers. Delegated domains must follow other standards and practices in this document, but are served from unit-managed servers.

Definition of delegation

“Administrative responsibility over any zone may be divided, thereby creating additional zones. Authority is said to be delegated for a portion of the old space, usually in form of sub-domains, to another nameserver and administrative entity.”Wikipedia entry for DNS

Delegation is appropriate when the unit:

  • wishes to use its own tools and servers for managing its DNS records,
  • has business requirements that are not met by Technology Services DNS tools,
  • has technical integration requirements (such as Active Directory dynamic DNS)

What can be delegated?

  • unit third-level domains (e.g. unit.illinois.edu)
  • non-university domains (e.g. .org domains registered to the unit)
  • reverse IP lookup zones (PTR zones, e.g. 100.168.192.IN-ADDR.ARPA).
    • The DNS architecture requires having 256 address blocks for reverse lookup delegation. Units with less than a 256 address subnet cannot have reverse DNS delegated.

Delegation considerations

In a delegated DNS environment, the unit’s DNS servers are the primary responders to queries to delegated domains.

Because your DNS servers are the authoritative “holders” of your domain information, they should be well-managed and highly available.

Technology Services must have contact information on file for the DNS server administrators.

DNS outages often appear as full network outages, which harm the functionality and image of the university and your unit. The Internet takes DNS seriously and so do we.

DNS servers need to be in the Fully Open firewall group to provide DNS responses to off-campus requests.

Technology Services needs to know if you are using a Windows Active Directory domain controller as the DNS server.

Recommended values for DNS delegations

Technology Services recommends that nameservers for delegated zones be configured with the following values. Note that Technology Services does not prohibit DNS administrators from making other choices, so long as the configuration still complies with the official requirements of delegation (as set forth in the delegation agreement).

Recommended values

SOA values

  • Refresh: 1 hour. Exception: If departmental name servers cannot send NOTIFYs to Technology Services name servers, please contact hostmgr to determine an appropriate value.
  • Retry: 15 mins
  • Expiry: 2 to 4 weeks
  • Minimum: 15 mins

TIP: Don’t forget that when modifying a high-profile record (e.g. for a public-facing webserver) it is a good idea to reduce the individual record TTL in advance of making the change (e.g. to a value of 1-5 minutes), and to restore it afterward to the default setting.

Firewall groups for true Delegations

Departmental name servers for true delegations MUST be placed in the Fully Open firewall group to allow udp/53 and tcp/53 from any host (including off campus).

Firewall groups for primary/secondary pseudo-delegations

Any departmental name servers which advertise themselves in an NS RRset SHOULD allow udp/53 and tcp/53 from any host (including off campus).

“Hidden primary” departmental name servers which only participate in primary/secondary pseudo-delegations and are not listed in any NS records MAY allow udp/53 and tcp/53 traffic from off campus but are not required to do so.

Recursion

All departmental name servers must either disable recursion and use the campus resolver (IPv4:130.126.2.131) or restrict recursion to only known hosts.

Delegation request process

Send an email to hostmgr with the required information.

  • domains and zones to be delegated
  • DNS server names and IP addresses
  • Contact information for the zones
  • Reason for delegation

Delegation lifecycle

Technology Services will conduct a yearly audit of delegations, which will include an interview and a verification letter. The purpose of the interview is to define what needs and requirements are not being met with the Technology Services DNS service offering. Regular feedback equips Technology Services with the necessary information to keep services relevant to campus.

Domain lifecycle

Changes to domains

  • Domain removal
    If you no longer are in need of a domain associated to you, email Hostmanager. Once the requested date of removal is met, the domain will no longer resolve and billing will cease at that point.
  • Transfers within the University
    If you no longer are in need of a domain and another department or unit would like to be associated with that domain, please contact Hostmanager. Hostmanager will coordinate between both departments to reach an agreement.

DNS technical considerations

Campus resolver IP address

The DNS resolver address for campus is 130.126.2.131.

DHCP Standards

Lease Time Guidelines

The default DHCP lease time is 1 day, which is well suited for nets with low turnover (i.e. the population of client machines is fairly stable and doesn’t change much).

Network administrators may choose to configure a different lease time on individual IPv4 DHCP Ranges (Dynamic Pools), subject to the following guidelines which are designed to keep overall load on the DHCP servers from growing unsustainably:

Lease time Guideline
1 day or longer Recommended for most networks
between 4 hours and 1 day No problem, use freely where desired for IPv4 nets with higher host turnover
between 1 hour and 4 hours Acceptable, but please exercise good judgment and use only where necessary
less than 1 hour Requires approval from service manager

Because IPv6 subnets are so spacious, there is generally no reason to reduce the DHCPv6 lease time parameters; IPv6 nets with higher host turnover which require Stateful autoconfiguration can simply be configured with larger DHCP Ranges in order to avoid running out of leases.

Range Size Guidelines

IPv4 DHCP Ranges (Dynamic Pools) should be sized so that the number of unassigned IP addresses in the Range (after all desired clients have obtained their leases, and not counting any addresses within Exclusion Ranges) will be at least 1-5% of the total, with a minimum of at least 2 unassigned IP addresses (even for very small Ranges) in order to properly utilize the redundancy provided by DHCP Failover.

Total Addresses in Range Minimum Unassigned Addresses
3-40 at least 2 addresses
41-200 at least 2-10 addresses (1-5% of total)
201+ at least 1-5% of total

Note: Email Alert thresholds should also be adjusted accordingly (to higher than 95%) if the expected number of unassigned IP addresses is less than 5% of the total.

Service Defaults

The following DHCP settings serve as defaults; they are configured at the top level of the Grid hierarchy and automatically inherited by all Networks. An individual Network, DHCP Range, DHCP Fixed Address, or DHCP-enabled Host can override one of these defaults by specifying its own value for the setting.

Client options

For DHCPv4:

code name value
6 domain-name-servers 130.126.2.131
42 ntp-servers 130.126.24.24, 130.126.24.44, 130.126.24.53
252 wpad-url ” ” (a blank space)

Proactively distributing a blank space for option 252 forestalls the Windows client behavior of continually sending DHCPINFORM requests to the DHCP server in an attempt to “automatically detect proxy settings”. This option value can of course be overridden with a real WPAD URL on individual subnets where automatic proxy configuration is desired.

For DHCPv6:

code name value
23

name-servers

2620:0:e00:a::1

Service settings

For DHCPv4:

  • Lease Time: 1 day (see Lease Time Guidelines above)
  • Authoritative: true
  • Ping Check: 1 request, with 1 second timeout

    This setting cannot be overridden for individual Networks or Ranges.

  • Enable DDNS Updates: false

    ddns-updates false prevents the DHCP server from attempting to do dynamic DNS updates on behalf of clients that choose to send a Client FQDN value in their DHCPREQUEST. This setting is not one of the options transmitted to clients, and will not affect their ability to perform their own dynamic DNS updates in Active Directory (or any other DDNS server).

For DHCPv6:

  • Valid Lifetime: 2 days
  • Preferred Lifetime: 1 day

  • Enable DDNS Updates: false